Deploying an https server
Overview
In this post, the first in a series, we'll deploy a Go https server at a custom domain name (Namecheap) via a VPS (DigitalOcean).
Prerequisites
- DigitalOcean & Namecheap accounts
- Bash shell (Terminal, Git Bash, Cygwin, etc)
- Some experience with nano or vi.
- Go, SFTP, and SSH installed
- SSH key pair
Discussion
Domain name registrars
Domain name registrars are the Tom Smykowskis of domain name distribution; they talk to us so ICANN doesn't have to. In fact, we're not even allowed to register a domain through ICANN directly; we have to go through one of their authorized registrars.
When choosing a registrar, we should prioritize ethics; registrars have the ability to hold domains hostage and we have limited recourse. For example, a registrar could log our domain availability searches, buy them, and sell back to us at a premium, a practice known as domain name front running. Worse, a registrar could intentionally delay our domain's renewal or registrar migration until its expiration during which they could acquire the "unowned" domain.
Two domain name registrars I recommend are Namecheap and Gandi. I've used Namecheap for ~8 years and have recommended them to friends and family for the last ~4. Their website's UI and reliability is mediocre but they have a spotless record and their customer support is very good. I've never used Gandhi myself, but many of my peers hold them in high esteem. Google Domains is also worth considering if you value website reliability and ui over customer support and privacy.
Server types
- Running our own servers will rarely be worth it before 1000+ machines but they offer us maximum control. When running our own servers, we would need to consider hardware logistics, availability (see 2020-2021 silicon chip shortage), failure rates, power outages, cooling solutions, etc on top of everything software.
- Infrastructure as a service (IAAS), often as virtual private servers (VPS) such as Amazon EC2 and DigitalOcean droplets, abstract away most hardware concerns so we can focus on the software. In theory, we can spin servers up and down as needed maintaining high per-server utilization to maximize cost-effectiveness. In practice, however, it's sufficiently easier/more reliable to spin up a new VPS rather than adding functionality/increasing complexity on an existing one that many VPSs end up overprovisioned.
- Platforms as a service (PAAS) such as Heroku and Google App Engine (GAE) handle many common software concerns such as autoscaling, resiliency, databases, and operating systems so we can focus on our server and business logic. This comes at the cost of some software limitations. For example, Heroku doesn't support C#, GAE doesn't support Clojure, and neither supports Rust, OCaml, or Perl.
- Functions as a service (FAAS/Serverless) such as AWS Lambda and Google Cloud Functions abstract away most server logic so we can focus on business logic. FAAS is best when we have a large budget or we have functions that have complex internals and simple APIs, are rarely called, have a longer than average run-time, and prioritize throughput over responsiveness. Overusing FAAS is inadvisable, however, even when we have large budgets, in the same way that making our code too DRY is. While each individual component may be simple, the feasible set of all possible relationships between them can grow factorially and handling even basic features like versioning can become a maintenance nightmare--think npm micromodules. Worse, in FAAS, these relationships typically occur over network boundaries.
VPS providers
If we value uptime, DigitalOcean and Amazon are two VPS providers with 99.99% uptime SLA. Historically, Linode promised 99.9% uptime. Since February 2021, however, Linode has started promising 99.99% uptime in the same way that Vultr promises 100% uptime, by not counting things like most maintenance. On the one hand, it's all pedantic since refunds don't come close to covering the value lost during downtime or corrupted/lost data. On the other hand, it's poor optics and in my experience, the quality of each listed providers' SLAs tracks pretty well with their relative reliability.
In the past year, I've noticed an uptick in DigitalOcean users reporting that they have been locked out of their accounts. I haven't experienced this in my ~6 years of using them but it's likely that the age of my account offers some protection against these automated tripwires. If you're a first-time/newer DigitalOcean user, then I'd recommend keeping your investment in/reliance on DigitalOcean small to start.
Directions
Domain setup
- Go to namecheap.com
- Select and purchase a custom domain name.
-
Navigate to your domain's Details view.
- Hover over Account.
- Click Domain List from the dropdown list.
- Click Manage next to your domain from the domain list.
-
Set up your domain's nameservers.

- Choose Custom DNS.
-
Add the following nameservers in the two
input fields:
- ns1.digitalocean.com
- ns2.digitalocean.com
-
Click the red ADD NAMESERVER link and
add the following nameserver in the new
input field:
- ns3.digitalocean.com
- Click the green checkmark to save your nameserver settings.
-
Disable the Parking Page.

Creating a VPS
- Go to cloud.digitalocean.com.
-
Go to the Create Droplets screen.
- Click the green Create button on the top-right.
- Select Droplet from the dropdown list.
-
Choose the image and plan.
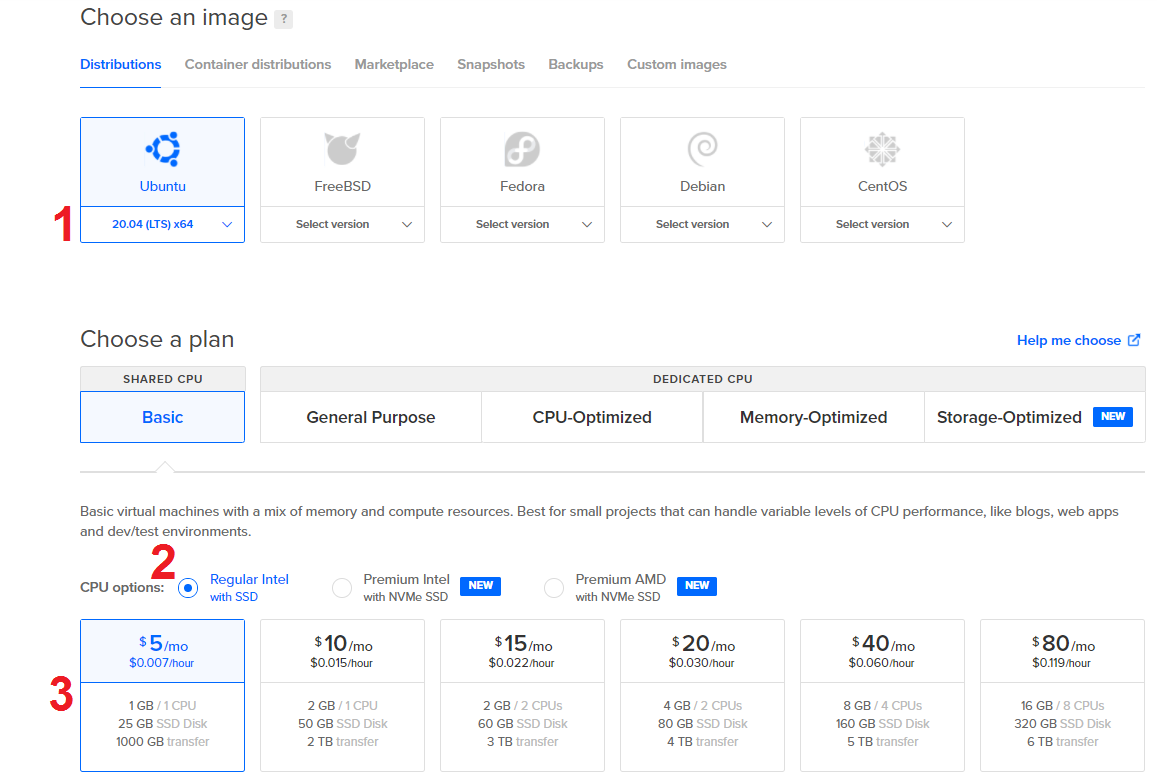
- Select 20.04 (LTS) x64 from the Ubuntu dropdown list.
- Select Regular Intel with SSD.
- Select the $5/mo option.
-
Set the authentication option and choose a
hostname.
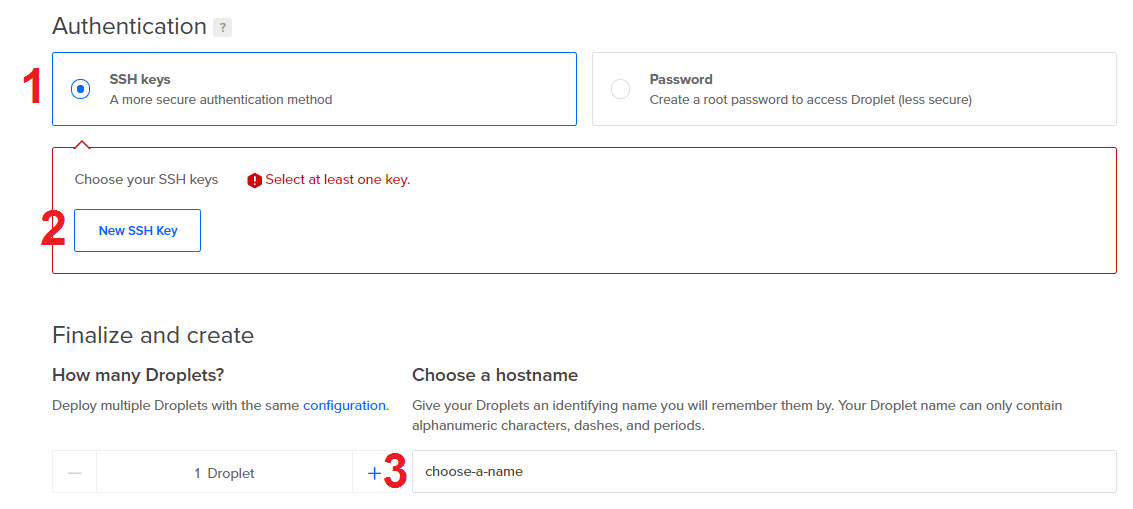
- Select SSH keys.
-
Click New SSH Key.
- Paste your public ssh key in SSH key content.
- Choose a name. I use the email associated with my ssh key.
- Click Add SSH Key.
- Choose a hostname for your droplet.
- At the bottom, click Create Droplet.
Linking domain to VPS
-
Add your domain.
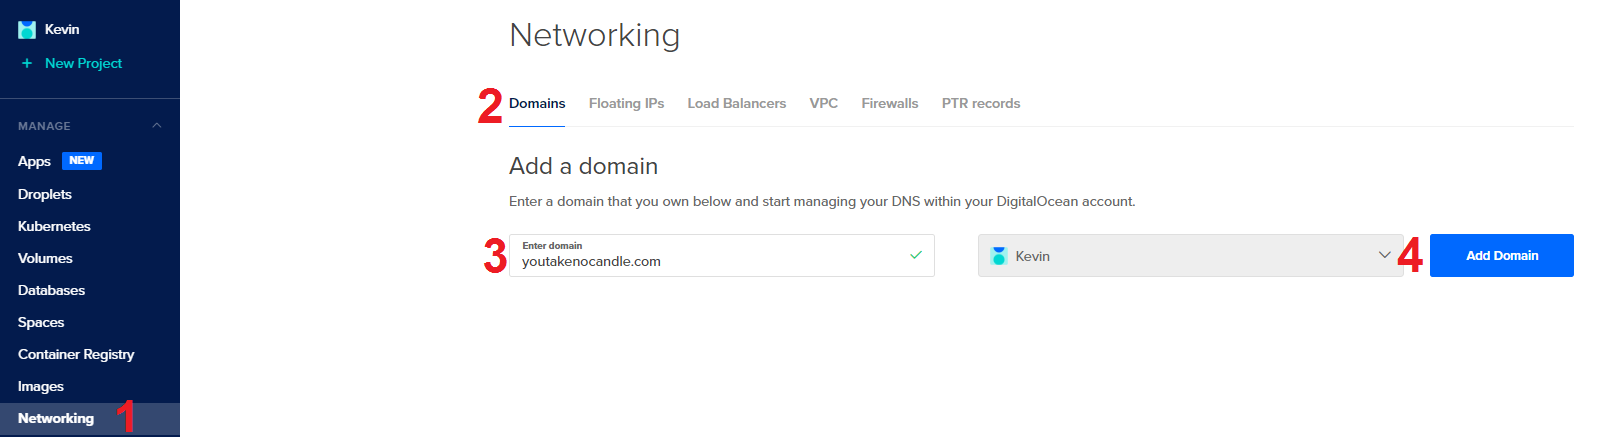
- Click Networking on the left sidebar.
- Click Domains on the navbar under the Networking header.
- Type in your domain.
- Click Add Domain.
- Click your domain under the domain list.
-
Create a DNS A record.

- Use @ for your hostname.
- Select your new droplet from the WILL DIRECT TO dropdown list.
- Use 60 for your TTL.
- Click Create Record.
- Create another DNS A record, this time using www for the hostname.
- Make note of your droplet's IP; we'll use this next. Look under the value column for an A record row in your DNS records that you just created.
Setting up VPS
- Open your bash shell.
-
SSH into your droplet.
ssh root@<droplet-ip> - Type yes to verify the authenticity of your droplet ip.
-
Change the root password.
passwd -
Add a user. You can leave all input prompts
empty besides your password.
adduser <username> -
Make your user a superuser.
usermod -aG sudo <username> -
Copy your public ssh key from root to your new
user.
rsync -a --chown=<username>:<username> ~/.ssh /home/<username> -
Harden your sshd config using a text editor like
nano or
vi. Add these changes
to the beginning of the file, one setting per
line.
<text-editor> /etc/ssh/sshd_config-
Change the port the ssh daemon listens
to. Don't use 22, 80, or 443.
Port <ssh-port> -
Disable ssh'ing as root.
PermitRootLogin no -
Only allow ssh'ing as your user.
AllowUsers <username>
-
Change the port the ssh daemon listens
to. Don't use 22, 80, or 443.
- Save the sshd config.
-
Restart the ssh daemon.
systemctl reload ssh -
Without closing your current ssh session, test
your sshd config by logging in from your user
from a new bash terminal.
ssh -p <ssh-port> <username>@<droplet-ip> -
Allow ssh connections through the firewall.
sudo ufw allow <ssh-port>/tcp -
Allow http connections through the firewall.
sudo ufw allow http/tcp -
Allow https connections through the firewall.
sudo ufw allow https/tcp -
Enable the firewall.
sudo ufw enable
Writing the Go https server
-
Back on your development machine, create a
directory for your website.
mkdir <directory-name> -
Navigate to your new directory.
cd <directory-name> -
Create a go mod file.
go mod init -
Create main.go using
the following code:
main.go
package main

import (
	"crypto/tls"
	"net/http"
	"os"

	"golang.org/x/crypto/acme/autocert"
)

func main() {
	http.HandleFunc("/", flocOptOut(func(w http.ResponseWriter, r_ *http.Request) {
		w.Write([]byte("hello world"))
	}))
	if os.Getenv("production") != "true" {
		http.ListenAndServe(":8080", nil)
	} else {
		m_ := &autocert.Manager{
			Cache:  autocert.DirCache("./certificates"),
			Prompt: autocert.AcceptTOS,
			HostPolicy: autocert.HostWhitelist(
				"www.<domain>.<tld>",
				"<domain>.<tld>",
			),
		}
		go http.ListenAndServe(":http", m_.HTTPHandler(nil))
		s_ := &http.Server{
			Addr: ":https",
			TLSConfig: &tls.Config{
				GetCertificate: m_.GetCertificate,
			},
		}
		s_.ListenAndServeTLS("", "")
	}
}

func flocOptOut(handler http.HandlerFunc) http.HandlerFunc {
	return func(w http.ResponseWriter, r_ *http.Request) {
		w.Header().Set("Permissions-Policy", "interest-cohort=()")
		handler(w, r_)
	}
}
main.go notes
- 11-13: Serve hello world for all routes.
- 15, 16, 26, 33: In development, serve http requests at port 8080. In production, redirect http requests (port 80) to https (port 443) and serve https requests at port 443.
- 18-25: In production, acquire and cache LetsEncrypt https certificate for listed domains.
- 12, 37-42: Opt out of FLoC.
-
Start your server locally.
go run . - You should be served a hello world when you navigate to http://localhost:8080
-
Stop your local server.
[Ctrl]+[C]
Serving hello world
- Open your bash shell.
-
Navigate to your
main.go
file.
cd </path/to/main.go> -
Build your server binary.
GOARCH=amd64 GOOS=linux go build -o server -
SFTP into your droplet.
sftp -P <port-number> <username>@<droplet-ip> -
Upload your server binary to your droplet.
put server -
Exit SFTP.
quit -
SSH into your droplet.
ssh -p <ssh-port> <username>@<droplet-ip> -
Allow your server binary to listen to privileged
ports (<1024) such as 80 (http) and 443
(https).
sudo setcap 'cap_net_bind_service=+ep' ./server -
Give yourself read, write, and execute
permissions on your server binary.
chmod 700 ./server -
Create a systemd config file to set your
service's environment variables, run your server
at startup, and auto-restart on crash.
sudo <text-editor> /etc/systemd/system/server.serviceserver.service
[Unit]
Description=Server service
After=network.target
After=systemd-user-sessions.service
After=network-online.target

[Service]
Environment=production=true
WorkingDirectory=/home/<username>
ExecStart=/home/<username>/server
ExecStop=/usr/bin/pkill server
Restart=on-failure
RestartSec=30

[Install]
WantedBy=multi-user.target
-
Enable your server systemd service.
sudo systemctl enable server -
Restart your droplet to enable Journal logging
and to start your server binary.
- There seems to be a bug where Journal won't log systemd services without a reboot first. If you know more, then please reach out!
- Using your preferred browser, navigate to your website twice, first in incognito mode and then in regular mode. The first time you visit your website, your server will acquire a LetsEncrypt https certificate. We do this in incognito first to avoid caching your website's temporary lack of a valid https certificate.